Revit: A Tour of the Interface

Print

1. Start Revit. Under Projects, select Architectural Template.

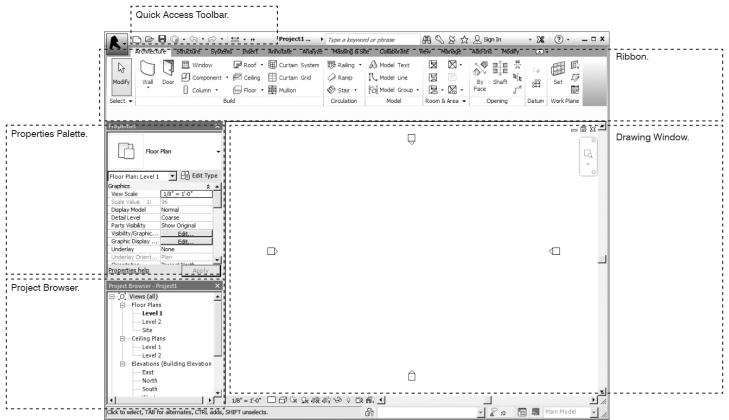
2. From the QUICK ACCESS TOOLBAR, click on the Default 3D view icon (it looks like a house).

3. On the Architecture tab in the RIBBON, find the Work Plane panel (far right side). Click on Show.

4. On the Architecture tab, Build panel, click Wall.

5. With the Wall command active, choose a wall type from the top area of the PROPERTIES PALETTE. (This area of the palette is known as the Type Selector.)

6. While the Wall command is active, notice that the RIBBON has changed to include a new set of tools. On the Modify | Place Wall tab, from the Draw panel, choose the Rectangle drawing tool.

7. Draw a rectangular enclosure by clicking two corner points on the Work Plane.

8. Choose Architecture > Build > Door. Insert one or more doors in the wall. Notice that Revit restricts how doors can be placed (i. e., doors must be “hosted” by walls).

9. Choose Architecture > Build > Window. Insert one or more windows in the wall. Windows must also be “hosted” by walls.

10. In the PROJECT BROWSER, double-click on the East Elevation view. Use this view to add new Levels (choose Architecture > Datum > Level, or Modify > Modify > Copy), or to change the location of existing Levels.

11. Return to the Default 3D view, and click on one wall of the rectangular enclosure. With the wall selected, change the Top Constraint (found in the PROPERTIES PALETTE) from Unconstrained to “Up to Level…”

12. Experiment with switching between views in the PROJECT BROWSER and changing the height of Levels.
InDesign: Interface and Navigation

InDesign’s features are accessed through pulldown menus, windows, and keyboard commands. InDesign is a “what you see is what you get” application, meaning that your work appears on-screen as it will fit to paper. This feature contrasts InDesign with Photoshop, where you must perform a preview to see how your work will fit on paper, and with AutoCAD, where formatting (in layout space) is performed separately from drawing (in model space).

The Tools window appears automatically when you create a new publication. If you lose the toolbox, choose Window > Tools. The Control window is usually docked at the top of the screen; it is accessed with Window > Control.


ZOOMING AND PANNING.
1. Choose the Zoom tool from the Tools window.

2. Click once within the document to zoom in; hold down the alt key while clicking to zoom out. (In Windows, click ctrl-plus (+) to zoom in, or ctrl-minus (-) to zoom out; click ctrl-zero (0) to fit the page to the screen. For Mac, substitute option for ctrl.)

3. Use the scroll bars on the right and bottom edges of the window to pan across the page.


MOVING BETWEEN PAGES.

Choose Window > Pages for a preview of the pages in your document.

To switch to a certain page within your document, select the page number from the pulldown list near the bottom left corner of the document window.


Rhino: Basic Interface Navigation

INTERFACE.

Rhino’s interface consists of a menu bar, a command window, toolbars and sidebars, panels, viewports, and an object snap (osnap) toolbar. Each of these interface components allows you to communicate information with Rhino in different ways. Usually, the Command prompt includes information about what Rhino expects you to do next – it’s good practice to check the Command prompt for instructions.

See this link for more information on the Rhino interface.


VIEWPORTS.

Viewports are windows through which your model is made simultaneously visible from different vantage points and in different projections. There are four viewports by default.

Double-clicking a viewport title will toggle between a full-screen and a tiled view.

Useful viewport-related commands:

3VIEW

4VIEW

SETVIEW

PLAN


PANNING, ROTATING, AND ZOOMING.

Hold down the right mouse button to rotate/orbit the view within a viewport.

To pan the view, hold down SHIFT while holding the right mouse button.

Roll the mouse wheel to zoom in and out.

See this link for more information on navigating in Rhino.