Step-by-Step: Building a Model in Revit

revit-tutorial_25-complete

Step 1. Begin a new project.

1.1. In the Revit startup screen, under Projects, click on Architectural Template.

Step 2. Set up a Basement Level.

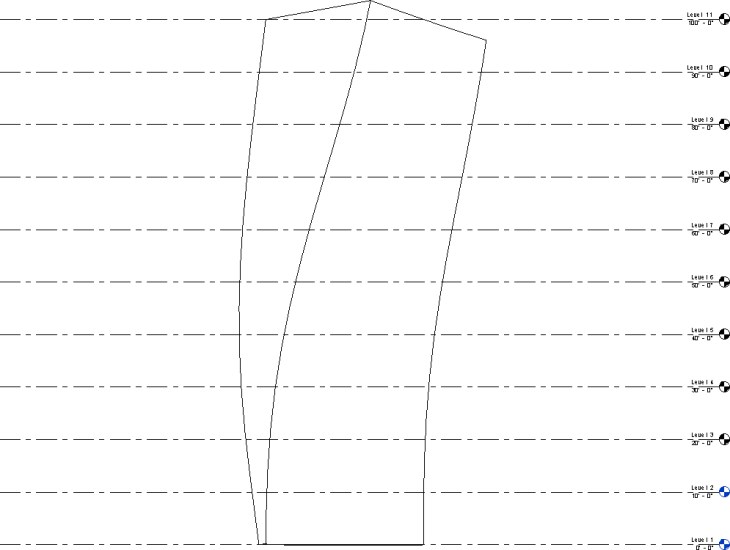
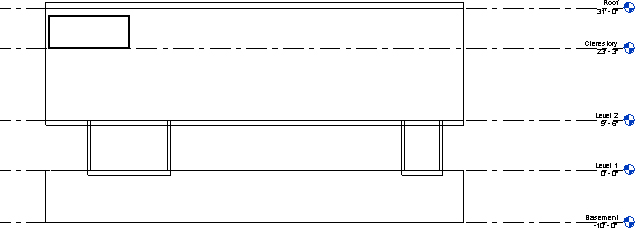
2.1. In the Project Browser, under Elevations (Building Elevation), double-click South.

2.2. Add a Level for the Basement, at an elevation of -10′-0″ (negative ten feet, zero inches).

2.2.1. On the Architecture tab, Datum panel, click on the Level tool. (Keyboard shortcut: LL.)

2.2.2. Position the Level tool at the left end of the already-existing Level 1 line. Don’t click yet; just move the tool downward until the dimension reads 10′-0″ (ten feet, zero inches).

2.2.3. Click to begin the Level.

2.2.4. Move the Level tool to the right until it aligns with the right endpoint of the already-existing Level 1 line.

2.2.5. Click to end the Level. (It will automatically be named Level 3.)

2.2.6. Click [esc] twice.

2.2.7. Double-click on the Level name (“Level 3”).

2.2.8. Type Basement in the text box and press [enter]. When prompted about renaming corresponding views, reply “Yes.”

2.2.9. Click [esc] twice.

Step 3. Modify the existing Level 2.

3.1. Change the elevation of Level 2 to 9′-6″.

3.1.1. Zoom in on the right end of the Level 2 line.

3.1.2. Double-click on the elevation text (10′-0″).

3.1.3. Type 9′-6″ in the text box and press [enter].

3.1.4. Click [esc] twice.

Step 4. Add Levels for the Clerestory and Roof.

4.1. Add a Level for the Clerestory at an elevation of 23′-3″ (twenty-three feet, three inches).

4.1.1. On the Modify tab, Modify panel, click the Copy tool. (By default, the Copy tool has a white circle and two blue circles. Keyboard shortcut: CO.)

4.1.2. Click anywhere on the existing Level 2.

4.1.3. Click [enter].

4.1.4. Click anywhere in the Drawing Area.

4.1.5. Move the mouse vertically, in the upward direction, and type 13′-9″ (thirteen feet, nine inches).

4.1.6. Click [esc] twice.

4.1.7. Rename the newly created Level to Clerestory by double-clicking on the Level name. When prompted about renaming corresponding views, reply “Yes.”

4.2. Using the same process as you used to add the Clerestory Level, add a Level for the Roof at an elevation of 31′-0″ (thirty-one feet, zero inches). (Tip: The Roof Level is 7′-9″ above the Clerestory Level.)

4.2.1. Rename the newly created Level to Roof by double-clicking on the Level name. When prompted about renaming corresponding views, reply “Yes.”

revit-tutorial_01-levels

Step 5. Add walls on Level 2.

5.1. In the Project Browser, double-click on Floor Plans – Level 2.

5.2. On the Architecture tab, Build panel, click the Wall tool. (Tip: Either click directly on the Wall tool icon, or choose Wall: Architectural from the dropdown.)

5.3. In the Options Bar, change the wall height from Unconnected to Roof. (Alternatively, in the Properties Palette, set the Top Constraint to “Up to level: Roof”.)

revit-tutorial_02-options-bar

5.4. In the Properties Palette, set the Type Selector to Basic Wall Generic – 8″.

5.5. In the Modify | Place Wall tab, click the Rectangle tool.

5.6. Use the Rectangle tool to construct a rectangular enclosure measuring 26′-2″ x 80′-0″, dimensioned to the Exterior Finish Face of the walls.

5.6.1. The Rectangle tool can be used to quickly sketch a rectnagular enclosure of approximately correct size; click on two corner points to draw. After the enclosure is sketched, use the temporary dimensions to adjust its size precisely. (Tip: After drawing the rectangle, click on the blue-filled circle at each of the dimension “witness lines” to change the measuring location for a dimension, then click on the dimension text to change the dimension.)

5.7. Click [esc] twice.

Step 6. Construct a Floor on Level 2.

6.1. On the Architecture tab, Build panel, click the Floor tool. (Tip: Either click directly on the Floor tool icon, or choose Floor: Architectural from the dropdown.)

6.2. Use the Floor tool to construct a Floor aligning with the Level 2 walls.

6.2.1. On the Modify | Create Floor Boundary tab, Draw panel, click the Pick Walls tool (it is selected by default).

6.2.2. Use the Pick Walls tool to click in turn on all four walls.

6.2.3. On the Modify | Create Floor Boundary tab, Mode panel, click the green check mark to complete the floor boundary.

6.3. Click [esc] twice.

6.4. Optional: At any point in the process, you can view your work in 3D by clicking on the Default 3D View tool in the Quick Access Toolbar.

revit-tutorial_03-default-3d-view

Step 7. Construct Level 1 walls.

7.1. In the Project Browser, double-click on the Level 1 floor plan.

7.2. In the Properties Palette, set Level 2 as underlay.

7.2.1. Click [esc] twice to make sure that nothing is selected. Then, in the Properties Palette, scroll down to the Underlay heading. Set the Range: Base Level to Level 2 and click Apply.

revit-tutorial_04-underlay

7.3. On the Architecture tab, Build panel, click the Wall tool. (Tip: Either click directly on the Wall tool icon, or choose Wall: Architectural from the dropdown.)

7.4. In the Options Bar, set the wall height to Level 2. (Alternatively, in the Properties Palette, set the Top Constraint to “Up to level: Level 2”.)

7.5. In the Modify | Place Wall tab, click the Line tool.

7.6. Use the Line tool to sketch four walls in the north-south direction corresponding to the diagram in the project handout. (Tip: To sketch a wall with the Line tool, hover the mouse over the existing Level 2 wall and click on a Nearest point; then move the mouse downward to the opposite wall and click on a Vertical and Nearest point. Click [esc] and repeat with the next wall. Click [esc] twice to drop the Wall tool.)

revit-tutorial_05-level-1-walls

7.7. Use Temporary Dimensions to precisely set the walls in their desired locations.

7.7.1. Because the project sketch does not indicate dimensions to position the Level 1 walls, you can determine these dimensions on your own. The dimensions in the following steps are shown as an example.

7.7.2. Click [esc] twice to make sure nothing is selected.

7.7.3. Click in succession on two adjacent Level 1 walls to highlight the Temporary Dimensions between them.

7.7.4. Click on the blue-filled circle at each of the dimension “witness lines” to change the measuring location for a dimension. Next, click on the dimension text to change the dimension.

7.7.5. Optional: Click on the Permanent Dimension icon (it is directly beneath the Temporary Dimension text) to display the dimension permanently. Next, click on the permanent dimension, and click on the padlock icon to lock the dimensional relationship.

7.7.6. Optional: Use the Aligned Dimension tool on the Quick Access Toolbar (Keyboard shortcut: DI) to add dimensions anywhere in the project.

revit-tutorial_05-level-1-dimensions

Step 8. Construct Level 1 floor.

8.1. On the Architecture tab, Build panel, click the Floor tool. (Tip: Either click directly on the Floor tool icon, or choose Floor: Architectural from the dropdown.)

8.2. Use the Floor tool to construct two separate floors corresponding to the wall locations.

8.2.1. On the Modify | Create Floor Boundary tab, Draw panel, click the Rectangle tool.

8.2.2. Use the Rectangle tool to draw rectangles corresponding to the two floor locations.

8.2.3. Optional: After drawing a rectangle, click the padlock icon to lock the edge of the floor to the wall.

8.2.4. On the Modify | Create Floor Boundary tab, Mode panel, click the green check mark to complete the floor boundary.

8.3. Click [esc] twice.

revit-tutorial_06-default-3d-view

Step 9. Construct basement walls and floor.

9.1. In the Project Browser, double-click on the Basement floor plan.

9.2. In the Properties Palette, set Level 2 as underlay.

9.2.1. Click [esc] twice to make sure that nothing is selected. Then, in the Properties Palette, scroll down to the Underlay heading. Set the Range: Base Level to Level 2 and click Apply.

9.3. Use the Wall tool to construct perimeter walls at the Basement level.

9.3.1. On the Architecture tab, Build panel, click the Wall tool. (Tip: Either click directly on the Wall tool icon, or choose Wall: Architectural from the dropdown.)

9.3.2. In the Options Bar, set the wall height to Level 1. (Alternatively, in the Properties Palette, set the Top Constraint to “Up to level: Level 1″.)

9.3.3. In the Properties Palette, set the Type Selector to Basic Wall Generic – 12”.

9.3.4. In the Modify | Place Wall tab, click the Rectangle tool.

9.3.5. In the Options Bar, set the Location Line to Finish Face: Exterior.

9.3.6. Click on two opposite corners of the rectangle, corresponding with the Level 2 walls, to create the basement walls.

9.3.7. Click [esc] twice.

revit-tutorial_07-default-3d-view

9.4. Construct the basement floor.

9.4.1. On the Architecture tab, Build panel, click the Floor tool. (Tip: Either click directly on the Floor tool icon, or choose Floor: Architectural from the dropdown.)

9.4.2. On the Properties Palette, use the Type Selector to choose the Generic – 12″ floor.

9.4.3. On the Modify | Create Floor Boundary tab, Draw panel, click the Pick Walls tool(it is selected by default).

9.4.4. Use the Pick Walls tool to click in turn on all four walls.

9.4.5. On the Modify | Create Floor Boundary tab, Mode panel, click the green check mark to complete the floor boundary.

Step 10. Construct the Roof.

10.1. In the Project Browser, double-click on the Roof floor plan.

10.2. In the Properties Palette, set Level 2 as underlay.

10.2.1. Make sure that nothing is selected. Then, in the Properties Palette, scroll down to the Underlay heading. Set the Range: Base Level to Level 2 and click Apply.

10.3. On the Architecture tab, Build panel, click the Roof by Footprint tool.

10.4. Use the Roof by Footprint tool to construct a flat roof.

10.4.1. In the Options Bar, make sure to check “off” on the Defines Slope box before creating the roof.

revit-tutorial_08-options-bar

10.4.2. In the Modify | Create Roof Footprint tab, Draw panel, click the Pick Walls tool (it is selected by default).

10.4.3. Use the Pick Walls tool to click in turn on all four walls.

10.4.4. On the Modify | Create Roof Boundary tab, Mode panel, click the green check mark to complete the roof boundary.

10.5. Click [esc] twice.

revit-tutorial_09-default-3d-view

Step 11. Construct the South Elevation Clerestory Windows.

11.1. Double-click on the South Elevation view.

11.2. On the Architecture tab, Build panel, click the Window tool.

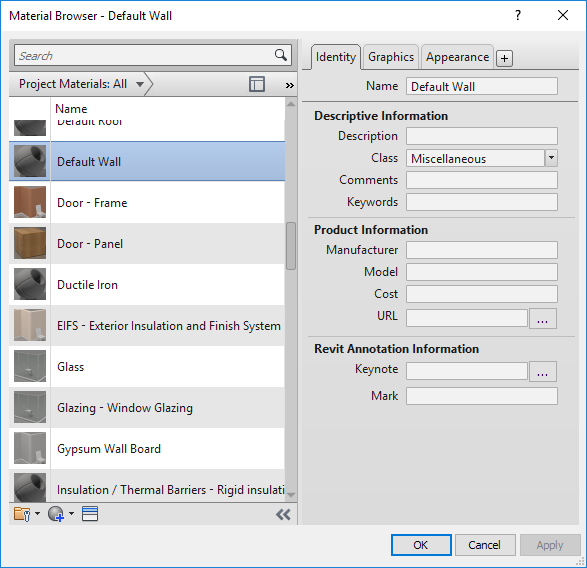
11.3. In the Properties Palette, use the Type Selector to choose the Fixed 36″ x 48″ window.

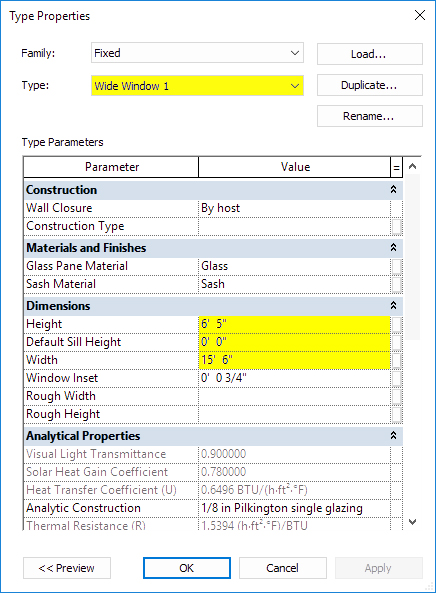
11.4. Click Edit Type.

11.5. In the Type Properties dialog box, click the Duplicate button (upper right-hand corner of the dialog box).

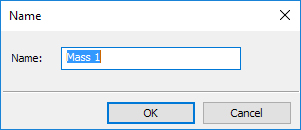
11.6. In the Name dialog box, type Wide Window 1, and click OK.

11.7. In the Dimensions section of the Type Properties dialog box, change the Height to 6′-5″ (six feet, five inches); change the Width to 15′-6″ (fifteen feet, six inches); and change the Default Sill Height to 0′-0″ (zero feet, zero inches).

revit-tutorial_10-type-properties
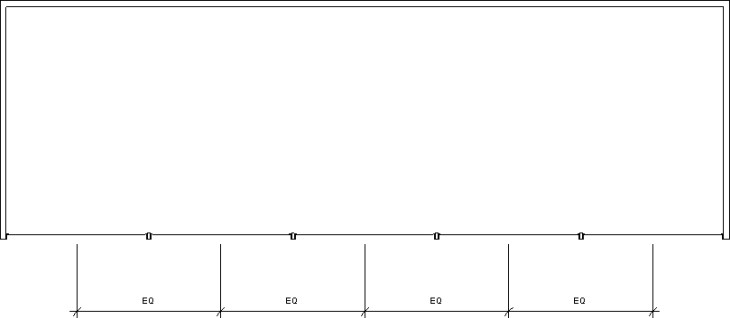
11.8. In the South Elevation view, move the mouse to the clerestory and click to place a window.

revit-tutorial_11-window-south-elevation

11.9. Click to place additional windows; press [esc] twice to drop the Window tool.

revit-tutorial_12-window-south-elevation

11.10. Optional: Fine-tune the placement of the windows using dimension tools.

11.10.1. Double-click on the Clerestory Floor Plan.

11.10.2. Zoom in on the left end of the window on the left end of the wall.

11.10.3. In the View Control Bar (bottom of the screen), set the view scale to 3″ = 1′-0″. (This has the effect of increasing the fineness of lines in the view.)

11.10.4. Use the Move tool (keyboard shortcut: MV) to position the window to align precisely with the interior surface of the perendicular wall.

11.10.5. Type ZE to zoom to the extents of the project.

11.10.6. Zoom in on the right end of the window on the right end of the wall.

11.10.7. Use the Move tool (keyboard shortcut: MV) to position the window to align precisely with the interior surface of the perendicular wall.

revit-tutorial_13-window-detail

11.10.8. Type ZE to zoom to the extents of the project.

11.10.9. In the View Control Bar (bottom of the screen), set the view scale to 1/8″ = 1′-0″.

11.10.10. Use the Aligned Dimension tool (keyboard shortcut: DI) to place dimensions measuring between the midpoints of the windows.

revit-tutorial_14-dimensions-unequal

11.11.11. Click the EQ symbol. The dimensions are equalized.

revit-tutorial_14-dimensions-equal

Step 12. Construct the East Elevation Clerestory Windows.

12.1. Double-click on the East Elevation view.

12.2. On the Architecture tab, Build panel, click the Window tool.

12.3. In the Properties Palette, use the Type Selector to choose the Wide Window 1 window.

12.4. Click Edit Type.

12.5. In the Type Properties dialog box, click the Duplicate button (upper right-hand corner of the dialog box).

12.6. In the Name dialog box, type Wide Window 2, and click OK.

12.7. In the Dimensions section of the Type Properties dialog box, change the Height to 6′-5″ (six feet, five inches); change the Width to 12′-3″ (twelve feet, three inches); and change the Default Sill Height to 0′-0″ (zero feet, zero inches).

12.8. In the East Elevation view, move the mouse to the clerestory and click to place a window.

12.9. Click to place additional windows; press [esc] twice to drop the Window tool.

12.10. Optional: Fine-tune the placement of the windows using dimension tools.

Step 13. Mirror the windows to opposite elevations.

13.1. Double-click on the Clerestory Floor Plan.

13.2. In the View Control Bar (bottom of the screen), set the view scale to 1/8″ = 1′-0″.

13.3. Type ZE to zoom to the project extents.

13.4. Select the windows on the south wall.

13.4.1. You can select the windows either by clicking on them one-at-a-time while pressing Ctrl. Or, you can draw a selection window around all of them at once, but then you will need to go to the Modify | Multi-Select tab, Selection panel, and click the Filter tool; check “off” on Walls.

13.5. With the windows selected, in the Modify | Windows tab, Modify panel, click the Mirror – Draw Axis tool (keyboard shortcut: DM).

13.6. Move the Mirror – Draw Axis tool to the midpoint of the west wall. When the midpoint is highlighted, click.

revit-tutorial_15-mirror

13.7. Move the Mirror – Draw Axis tool to the right to indicate a horizontal mirroring line. Click to complete.

13.8. Repeat the mirroring process with the windows on the east wall.

revit-tutorial_16-default-3d-view

Step 14. Expand or redraw the existing Level 1 floor to receive the stair.

14.1.1. Double-click on the Level 1 Floor Plan.

14.1.2. Click on the existing Level 1 floor to select it.

14.1.3. On the Modify | Floors tab, Mode panel, click the Edit Boundary tool.

14.1.4. Use the Draw tools (Modify | Floors > Edit Boundary tab, Draw panel) to adjust the boundary of the floor. Alternatively, the existing floor boundary can be erased and redrawn.

revit-tutorial_17-floor-boundary-before

revit-tutorial_18-floor-boundary-after.jpg

14.1.5. On the Modify | Edit Boundary tab, Mode panel, click the green check mark to complete the floor boundary. If prompted with “Would you like walls that go up to this floor’s level to attach to its bottom?” reply “No.”

Step 15. Construct the Stair from Level 1 to Level 2.

15.1. Double-click on the Level 1 floor plan.

15.2. Click [esc] twice to make sure nothing is selected.

15.3. On the Architecture tab, Circulation panel, choose the Stair by Sketch tool (from the Stair tool dropdown menu).

15.4. In the Properties Palette, check the parameters for the stair. The Base Level should be set to Level 1 and the Top Level to Level 2. Optional: Other stair-specific data can be changed using other parameters within the Properties Palette.

15.5. Click on a point within the stair hall (leftmost space on the first floor) to begin the stair.

15.6. As you move the mouse vertically within the stair hall, Revit will report the number of risers created and the number of risers remaining. (These numbers are determined by the stair parameters in the Properties Palette.)

revit-tutorial_19-stair

15.7. Continue to move the mouse vertically, past the point where the number of risers remaining is 0 (zero). Click to complete the stair.

15.8. On the Modify | Create Stairs Sketch tab, Mode panel, click the green check mark to complete the stair.

15.9. Click [esc] twice.

Step 16. Create a floor opening in Level 2 for the stair.

16.1. Double-click on the Level 2 floor plan.

16.2. On the View Control bar, change the Visual Style to Wireframe. (The Visual Style is set with the icon that looks like a solid cube.) This has the effect of making the floor transparent, so that the stair leading up to this level can be seen.

16.3. Select the existing Level 2 floor.

16.3.1. One way to select the existing floor is to draw a selection window around the entire building, then use the Selection Filter (Modify | Multi-Select tab, Selection panel) to check “off” on everything which is not a floor.

16.4. On the Modify | Floors tab, Mode panel, click the Edit Boundary tool.

16.5. Use the Draw tools (Modify | Floors > Edit Boundary tab, Draw panel) to create a rectangular floor opening at the stair.

revit-tutorial_20-floor-opening

16.5.1. Optional: Use the padlock icons to lock the floor opening edges to the stair.

16.6. On the Modify | Edit Boundary tab, Mode panel, click the green check mark to complete the floor boundary. If prompted with “Would you like walls that go up to this floor’s level to attach to its bottom?” reply “No.”

revit-tutorial_21-stair

Step 17. Construct the Stair from the Basement to Level 1.

17.1. This process is similar to the process for constructing the stair from Level 1 to Level 2. Refer to that process for detail.

Step 18. Create a floor opening in Level 1 for the stair.

18.1. This process is similar to the process for creating a floor opening in Level 2. Refer to that process for detail.

revit-tutorial_22-stair

Step 19. Create a Toposurface around the building.

19.1. Double-click on the Site Floor Plan.

19.2. On the Massing & Site tab, Model Site panel, click the Toposurface tool.

19.3. On the Options Bar, set the Elevation to -6″ (negative six inches).

revit-tutorial_23-options-bar

19.4. In the drawing area, click on a succession of points to establish a rough rectangular boundary around the building.

revit-tutorial_24-site

19.5. On the Modify | Edit Surface tab, Surface panel, click the green check mark to complete the toposurface.

Step 20. Create a Building Pad.

20.1. Double-click on the Site Floor Plan.

20.2. On the Massing & Site tab, Modify Site panel, click the Building Pad tool.

20.3. In the Properties Palette, set the Level to Basement.

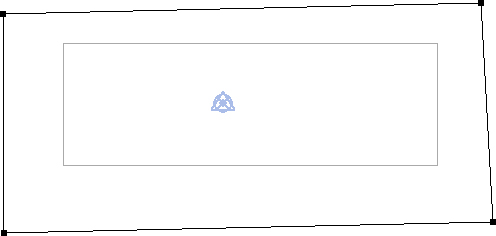
20.4. On the Modify | Create Pad Boundary tab, Draw panel, click the Rectangle tool.

20.5. Use the Rectangle tool to trace the outline of the building. Optional: Use the padlock tools to lock the Building Pad edges to the building.

20.6. On the Modify | Create Pad Boundary tab, Mode panel, click the green check mark.

The model is complete.

revit-tutorial_25-complete.jpg

Rhino to Revit Workflow: Twisted Tower

This workflow demonstrates the possibility of importing mass models from Rhino into Revit for use as Mass Elements. In turn, Revit Masses can be used as the basis for constructing building elements such as floors and walls.

1. In Rhino, create a simple box with plan dimensions 30’ x 30’ and height 100’.

tower_01

2. Type TWIST [enter]. Follow the prompts to twist the tower.

3. Select the twisted tower by clicking on it. Choose File > Export Selected and export the tower as an ACIS SAT file (.sat extension).

tower_02.jpg

4. In Revit, start a new Project based on the Architectural template, or open an existing Project.

5. Start a new Family based on the Conceptual Mass template.

tower_03.jpg

6. On the Insert tab, Import panel, choose Import CAD and navigate to your .sat file. (Make sure that Files of type is set to show .sat files.) Click Open.

tower_04.jpg

7. On the Insert tab, Family Editor panel, choose Load into Project.

8. Click to place the mass.

9. View the mass in the default 3D view to verify its configuration and size.

tower_05.jpg

10. Switch to an Elevation view. Add Levels corresponding to building floors.

tower_06.jpg

11. Click the mass to select it. On the Modify|Mass tab, Model panel, click Mass Floors.

tower_08.jpg

12. Select the Levels for which you wish to create Mass Floors. (Note: depending on the geometry of your tower, the upper and lower Levels may not reliably create Mass Floors.)

tower_09

13. Proceed to use the tools under Massing & Site > Model by Face to create walls and floors.


Applying Materials Within a Revit Project

Materials can be assigned to elements in Revit projects in several ways. For example, an entire category of elements, such as Walls, can be assigned a single material in one step. Or, a face of an element, such as the exterior surface of a single Wall, can be assigned a material.

Generally, materials are organized and specified using the Material Browser. The Material Browser can be accessed directly, or it can be accessed during a material-application process.

Applying a Material to a category of elements:

1. Open an existing Revit project.

revit_01_17.jpg

2. On the Manage panel, Settings tab, click the Object Styles tool.

revit_01_16

3. In the Object Styles dialog box, highlight a Category of elements for material application (for example, “Walls”).

revit_01_19

4. Click the entry in the Material column (for example, “Default Wall”).

5. Click on the ellipsis (“…”) next to the Material entry. This takes you to the Material Browser, where you can specify material settings for the selected category. (See the Material Browser tutorial for further information on materials.)


Using the Material Browser to Specify and Create Materials

This post covers two related concepts: Setting and Editing Properties for Existing Materials and Creating New Materials.

The Material Browser is Revit’s interface for setting the attributes and properties of simulated materials in projects. The Material Browser can be used to specify those attributes for existing materials as well as to create new materials for application within the project.

The Material Browser can be accessed directly from Revit’s interface by choosing the Materials tool within the Settings panel of the Manage tab.

revit_01_20

The Material Browser provides control over material properties and material assets. Material properties are specific parameters that define the visual and performance characteristics of simulated materials. Material assets are groups of properties.

Revit’s material properties are grouped into four types of material assets:

Graphics assets include the properties for non-rendered display of materials. For example, the color which Revit uses to display a material in the default (non-rendered) 3D view is controlled here.

Appearance assets include the properties for rendered display of materials. For example, a material’s reflectivity and transparency properties are organized into appearance assets.

Physical assets include properties related to a material’s structural performance and behavior. For example, properties such as a material’s yield strength are organized into physical assets.

Thermal assets include properties related to a material’s thermal performance. For example, properties such as a material’s thermal conductivity, density, and permeability are organized into thermal assets.

To Set or Edit Properties for Existing Materials.

1. Open the Material Browser (Manage > Settings > Materials).

2. Scroll vertically to find the existing material you wish to edit. Click on the material name (for example, “Default Wall”).

3. Click the Identity tab if you wish to edit the material’s Name, Descriptive Information, Product Information, or Annotation Information.

revit_01_21.jpg

4. Click the Graphics tab if you wish to edit the material’s Shading (its appearance in non-rendered 3D views and elevations), Surface Pattern (the appearance of its outer surface in non-rendered views), or Cut Pattern (its appearance when it is cut in non-rendered views).

revit_01_22.jpg

5. Click the Appearance tab for full control over the appearance of the material in rendered views.

revit_01_23.jpg

Generic. The value for Color refers to a base color under neutral lighting. The setting for Image allows you to select an image as a “diffuse color map,” i. e. the underlying image affecting how light is reflected from the material. Image Fade (only available if an Image is selected) controls the relationship between the image and the base color. Glossiness affects how “shiny” or “glossy” the material appears. The dropdown selection for Highlights controls how light is reflected from the material’s surface.

render_smooth-sphere.jpg

Material rendered without image (left) and with image (right).


Reflectivity. These settings affect how the surrounding environment is reflected in the material’s surface. The reflectivity settings are related to the Generic settings for Glossiness, i. e., glossier materials will tend to perform better as reflecting surfaces.

Transparency. The Amount can be set between 1.0 (100% transparent) and 0.0 (0% transparent, i. e., completely opaque). The Image setting allows an image to be used as a transparency map, and Image Fade controls the opacity of this image. Translucency (available only for nonzero Transparency values) controls the amount of light scattered by the material as the light passes through. Refraction simulates a physical property associated with the extent to which light rays “bend” as they encounter the material surface.

render_transparency-80_glass

Variations in Refraction. Glass (left) and Water (right).


Cutouts. A cutout is simply a grayscale image which affects the transparency of a material. White pixels in the image render as transparent and black pixels render as opaque. A color image can be used as a cutout, but it is interpreted based on its equivalent grey values.

render_cutout

Cutout.


Self Illumination settings are used to make a material appear to glow. However, self-illuminated objects do not cast light onto other objects. (Note: Other rendering software, like 3DS or Maxwell, will allow self-illuminating objects or emitters to cast light onto other objects.)

render_self-illumination

Self Illumination.


Bump. A bump map is an image applied to the surface of a material which has the effect of giving the material a bumpy or irregular appearance. Revit interprets the image according to its grayscale values: black pixels appear lower while white pixels appear higher.

render_bump.jpg

Bump map.


Tint. The tint value changes the appearance of the material’s base color.

render_tint

An untinted blue material (left), and the same material with a yellow tint added (right).


To Create a New Material.


1. Open the Material Browser (Manage > Settings > Materials).

2. Click the New Material button at the bottom of the dialog box.

3. Choose either Create New Material (to create a new material entirely from default settings) or Duplicate Selected Material (to create a new material based on existing material settings for a selected material).

4. Modify settings as described above.

Modeling from Mass Instances

This workflow is concerned with the creation of Revit geometry (building elements), such as floors and walls, based on imported masses. (For an example of importing a mass, see Importing a SketchUp Massing Model to Revit.)

1. Create or load a Mass family into a Revit project.

revit_01_05

2. View the mass in an Elevation view.

3. Create Levels corresponding to floor surfaces.

revit_01_07.jpg

4. Return to the default 3D view and select the mass by clicking on it.

revit_01_08.jpg

5. On the Modify|Mass tab, Model panel, click the Mass Floors tool.

revit_01_09

6. Select the Levels corresponding to the Mass Floors you wish to construct. Click OK.

revit_01_10.jpg

7. Verify the placement of the Mass Floors in the default 3D view. (Note: You may need to adjust the Visibility/Graphics settings to see the mass and the floors. Type VG and make sure the Mass category is fully visible.)

revit_01_11.jpg

8. On the Massing & Site tab, Model by Face panel, click the Floor tool.

revit_01_12.jpg

9. On the Modify|Place Floor by Face tab, Multiple Selection panel, click the Select Multiple tool.

revit_01_13

10. Click on a Mass Floor for which you wish to create a building floor. (Note: If the floor is to be offset from the level of its corresponding Mass Floor, set the Offset value on the Options Bar.)

11. In the Properties Palette, choose a Floor Type for the floor you wish to create.

revit_01_14.jpg

12. On the Modify|Place Floor by Face tab, Multiple Selection panel, click Create Floor.

13. Check the placement of floors in the default 3D view. (Note: You may need to adjust the Visibility/Graphics settings in order to hide the mass elements. Type VG and make sure the Mass category is hidden, i. e., unchecked.)

revit_01_15.jpg

Importing a SketchUp Massing Model to Revit

This workflow is intended for the situation in which you have created a massing model in SketchUp and wish to use the model as a guide for the construction of detailed Revit geometry. For the purposes of this tutorial, a massing model is understood to mean a model without interior volumes (corresponding to rooms) and without openings (corresponding to windows and doors).

1. Create a massing model in SketchUp.

2. Save the SketchUp model in .skp format. IMPORTANT: When saving from SketchUp, make sure to use SketchUp Version 8 to ensure compatibility with Revit.

revit_01_04

3. Start a new Revit project, or open an existing project in which you wish to place the massing model.

4. On the Massing & Site tab, Conceptual Mass panel, click the In-Place Mass tool.

revit_01_00

5. If the “Show Mass Enabled” dialog box appears, click Close. (This box appears to notify you that Revit has automatically enabled the display of mass elements.)

revit_01_01

6. Give the mass a name and click OK.

revit_01_02

7. On the Insert tab, Import panel, click the Import CAD tool.

revit_01_03.jpg

8. In the Import CAD Formats dialog box, navigate to your SketchUp file. Accept the default settings, and click Open.

9. Check the default 3D view of your imported massing model.

revit_01_05.jpg

10. Check the overall dimensions of the imported massing model to verify correct scaling. (If the model has imported at the incorrect size, it may be necessary to return to SketchUp to correct the model size and then repeat the importing procedure. Alternatively, it may be necessary to check the settings in Revit’s Import CAD Formats dialog box. Make sure that the Import units are at the default setting of “Auto-Detect.”)

11. On the Insert tab, In-Place Editor panel, click Finish Mass to complete the importing process.

revit_01_06

12. The massing model is now available in the Revit drawing window for further development.

Revit: Learning Resources

This page includes links to recommended resources for learning Revit.

BOOKS:

Autodesk Revit 2017 for Architecture No Experience Required, by Eric Wing. This is a detailed resource for students who are completely unfamiliar with Revit. It leads readers through the production of a Revit project similar to what they might encounter in contemporary professional practice. The book is the latest revision to an old title, and earlier versions of the same title are just as good (allowing for the minor changes made to the app every year).

Residential Design Using Autodesk Revit 2017, by Daniel John Stine. This book is especially useful for the student who wishes to understand the use of Revit in residential design. This approach distinguishes Stine’s text from other books focused on large-scale commercial or institutional design. Because Revit workflows and strategies vary according to project size and scale, students should consider this text if they have a specific interest in smaller-scale design.

Mastering Autodesk Revit 2017 for Architecture, by Lance Kirby, Eddy Krygiel, and Marcus Kim. This book is the latest revision to an old title. It assumes some basic Revit knowledge – it does not start from scratch. Use this book if you are interested in expanding upon your understanding of Revit fundamentals.


VIDEO TUTORIALS:

Autodesk’s product-specific video tutorials are probably the best integrated collection available online. The tutorials are appropriate for students without prior experience in Revit, provided they are completed in order. http://help.autodesk.com/view/RVT/2017/ENU/ — or for an older version of the same content, see http://help.autodesk.com/view/RVT/2016/ENU/


The publisher O’Reilly has a series of free, short, introductory tutorials on Revit. (Additional tutorials are available for a fee.) The tutorials under the heading of “Things You Must Do First” are especially useful. http://tinyurl.com/jjfjlpl (Full link: http://shop.oreilly.com/product/0636920040392.do?cmp=yt-design-books-videos-product-na_video___revit_architecture_2016)

Revit: Placing Grids and Columns

This tutorial will work for a new project (if you would like to start the project by making a grid) or an existing project (if you have an existing project and you would like to add a grid).

Some definitions:

gridline: in Revit, a gridline is (by default) a vertical plane with finite extent. It is used as a means of organizing and aligning components in the project. Each gridline has a unique identifying bubble.

grid: Revit uses the term “grid” to refer to a collection of gridlines.

structural column: In Revit, a “structural column” is a vertical (or sloped) element in the project representing a load-bearing element, i. e., an actual column in the building.

architectural column: in Revit, an “architectural column” is a column-shaped element which can represent either a load-bearing element or a non-load bearing (i. e., a decorative) element. In the practice of building Revit models, architectural columns are often co-located with structural columns, so that the architectural column becomes a kind of “wrap” around the structural column.


To set up a conventional (straight-line) grid:

1. On the Architecture tab, Datum panel, click Grid.

2. Click a point to begin drawing a gridline.

3. Click a second point to finish the gridline.

4. (Optional) Click on the check box to place a grid bubble. The default check box can also be unchecked to remove the default grid bubble.

5. (Optional) Click on the elbow symbol to introduce an elbow or break within the gridline.

6. To add a second gridline, either repeat the previous steps, or use Revit’s Copy or Array tools to copy the existing gridline:

Option 1: Using Revit’s Copy tool: On the Modify tab, Modify panel, click the Copy tool (or type CO). Click once on the existing gridline and press Enter. Next, click on two points one after the other to indicate the “start from” and “copy to” points. Once the gridline is copied, Revit will display a temporary dimension which can be used to precisely locate the new gridline with respect to the existing one.

Option 2: Using Revit’s Array tool: On the Modify tab, Modify panel, click the Array tool (or type AR). Click once on the existing gridline and press Enter. On the Options bar, select the type of array to create (linear or radial); check “Group and Associate” to send all gridlines to a group (not recommended for gridlines); speficy the number of gridlines to create (including the existing gridline); and specify whether the “Move To” point will represent either the “2nd” gridline in the array or the “Last” gridline. Check “Constrain” to constrain the Move To point to orthogonal dimensions, and check “Activate Dimensions” to ensure that the temporary dimensions appear.


To place Structural Columns:

Broadly speaking, two options exist for placing structural columns: manual or automatic placement.

Option 1: To place structural columns manually, choose Column > Structural Column from the Architecture > Build panel. Use the Options Bar to control the column height. Click to place a column; repeat until done; press esc twice to complete the task.

Option 2: To place structural columns automatically,  choose Column > Structural Column from the Architecture > Build panel. On the Modify | Place Structural Column tab, Multiple panel, click At Grids. Highlight all gridlines for column placement at grid intersections. Click the green check mark to finish, then press esc to complete the task.

Important note: By default, Revit constructs structural columns “from the top down.” This means that  the properties of columns may need to be adjusted after placing them, to make sure they are extending vertically to the intended extents. Use an Elevation view to verify the vertical placement of structural columns, and then use the Properties Palette to adjust the Base Level (by default, the level which was active when the columns were placed), the Top Level (the level to which the columns should extend), and the Base Offset (by default, a negative number pointing downward from the Base Level; it can be set to zero).


To place Architectural Columns:

Choose Column > Architectural Column from the Architecture > Build panel. Use the Options Bar to control the column height. Click to place a column; repeat until done; press esc twice to complete the task.

Step-by-Step: Revit Tutorial / Adding Windows and Doors

To use this step-by-step tutorial, you will need to begin with an existing Revit model containing at least one wall.

WINDOWS

1. Choose a window type. On the Ribbon: Architecture > Build > Window. In the Properties palette, choose an appropriate window type (e. g., Fixed 36″ x 48″).

2. Navigate and place. In either a 3D view or a floor plan view of your model, navigate the mouse over the model and click to place a window. Window locations can be modified after placement by clicking on dimension strings and editing them. Windows can also be moved using the Move tool (Modify > Modify > Move, or type MV).


Notes:

To Create a Custom Window Size: On the Ribbon: Architecture > Build > Window. In the Properties palette, choose an appropriate window type (e. g., Fixed 36″ x 48″). In the Properties palette, click Edit Type. In the Type Properties dialog box, click Duplicate. Give the new window type a name (such as Custom — 72″ x 80″). Under Type Parameters, edit the Height and Width dimensions as required. Click OK to exit the Type Properties dialog box.

To Load Additional Window Families: On the Ribbon: Insert > Load from Library > Load Family. In the Load Family dialog box, navigate to the Windows directory and double-click on the family you wish to load. The next time you choose Window from the Architecture > Build panel, the newly loaded family will be available in the Type Selector.


DOORS

1. To Add Doors. Note that the process for inserting Doors is very similar to the process for Windows. Start with Architecture > Build > Door and selecting the desired door type in the Properties Palette. Doors can be placed in different views (e. g. floor plan views or 3D views).

Step-by-Step: Revit Tutorial / Adding Stairs

To use this step-by-step tutorial, you’ll need an existing Revit model containing at least two floor levels.

1. Insert Stairs. In the Project Browser, double-click on the Floor Plan view corresponding to the lower of two floors you wish to join with a stair. On the Ribbon: Architecture > Circulation > Stair (Stair by Component). Next, on the Ribbon: Modify | Create Stair > Components, choose Run, and then click in the floor plan to begin the stair.

2. To create a single-run stair: move the mouse in the direction of the stair run until Revit reads “0 remaining” risers. Click to complete the stair. Finally, click the green check mark.

3. To create a switchback (double-run) stair: move the mouse in the direction of the first run for the desired number of risers. Click to complete the run. Move the mouse to the starting point of the next run and click to start. Move the mouse in the direction of the second run until Revit reads “0 remaining” risers. Click to complete the stair. Finally, click the green check mark.

4. Create Openings in Floors. In the Project Browser, double-click on a floor plan. Window the entire model to select it. On the Ribbon: Modify | Multi-Select > Selection > Filter. Uncheck all selection categories except Floors.

5. Next, on the Ribbon: Modify | Floors > Mode > Edit Boundary. Then, on the Ribbon: Modify | Floors > Edit Boundary > Draw, choose Boundary Line. Use the Draw tools (and other tools as needed in the Modify panel) to draw the required boundaries. When complete, on the Ribbon: Modify | Floors > Edit Boundary > Mode, click the green check mark to complete the sketch.