Step-by-Step: Revit Tutorial / Importing Background Sketches

This workflow is intended for situations in which you have a drawing or image which you would like to “trace” in Revit as the base for 3D modeling. This drawing or image could be:

A scan of a hand-drawn floor plan;

A scan of a drawing or a photograph from a printed source;

A downloaded image or digital photo.

This workflow necessarily differs from the workflow for importing an image for rendering purposes. This topic is covered elsewhere. This workflow is specifically directed to the import of background images for tracing purposes.

To use this workflow, the image either must be at a known scale (for example, 1/8” = 1’-0”) or it must include at least one known dimension (for example, the length of a wall or the width of an opening). Furthermore, the image must be at a known resolution, preferably 72 pixels per inch.

To begin:
1. Open the image in Photoshop. For this example, we’ll assume that the image represents a floor plan drawing at a scale of 1/8” = 1’-0”. (If your image represents a drawing at a scale other than this, click here for further discussion.)

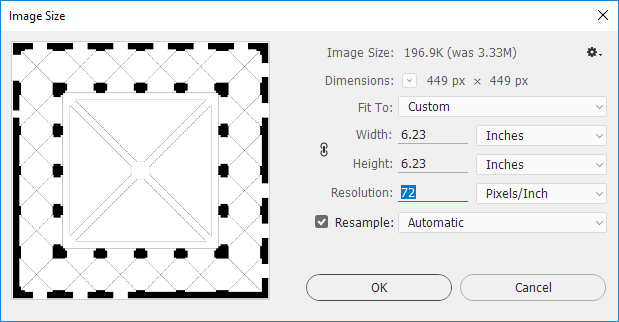
2. Use Photoshop’s Image > Image Size dialog to adjust the image’s resolution to 72 Pixels/Inch. Make sure that Resample is turned on. (If you prefer not to resample the image because you need to retain fine detail, refer to the discussion on scaling.)

revit_00_09
Scaling the image in Photoshop.

3. Save the image in the JPEG format and quit Photoshop.

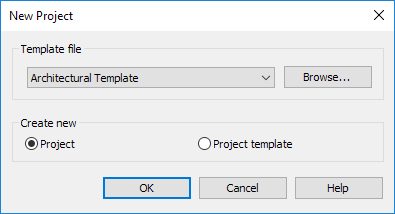
4. Start a new project in Revit (or open an existing Revit project). Use the Architectural template.

revit_00_01
Starting a New Project in Revit.

5. On the Ribbon: Insert > Import > Image.

revit_00_02.jpg
Inserting the image in Revit.

6. Navigate to the file location and click Open.

7. In the Revit Drawing Area, click to place the image.

8. With the image selected, type ZE. (This command zooms the view to show the whole project.)

9. In this example, we already know that the image is at a resolution of 72 pixels per inch and that it represents a drawing at a scale of 1/8” = 1’-0”. Therefore, no further scaling is required. (But click here for further discussion of the scaling question.)

10. You may need to reposition the image in the center of the Revit workspace. If so, click and drag the image, or use the Move tool (type MV, or find it on the Ribbon at Modify > Modify > Move).

11. If necessary, adjust the location of the elevation tags in the Drawing Area by selecting and dragging them to the correct location (e. g., adjacent to the four sides of the floor plan).

revit_00_10.jpg
Elevation tags prior to repositioning (left) and elevation tags after repositioning (right).

12. You can now proceed to trace the plan, for example by using the Wall tool on Revit’s Architecture > Build panel. (Refer to the tutorial on Basic Building Shell + Floors.)

Advertisement

Step-by-Step: Revit Tutorial / Basic Building Shell + Floors

This tutorial assumes that you have a basic building design sketched out and ready to model in Revit. The tutorial also assumes that you have some approximate knowledge about the site contours immediately adjacent to the building.

1. Create a New Project using the Architectural Template.

revit_03_01

2. Sketch the plan of exterior walls. On the Ribbon: Architecture > Build > Wall (or type WA). On the Properties Palette, choose a wall type. You can always change this later, so you might begin by choosing Basic Wall — Generic — 6″. On the Options Bar, for Location Line, choose Finish Face: Exterior. Make sure the Chain option is selected. Click point by point, proceeding counterclockwise around the plan, until the sketch is complete. Click esc to end the command.

3. Make any adjustments for unique walls. For example, if one wall is thicker than most, select it (using the Modify tool) and choose a different wall type from the Type Selector (at the top of the Properties Palette). If you want to create a completely unique wall type, click Edit Type in the Properties Palette. In the Type Properties dialog box, click Duplicate. Give the new wall type a name (such as Generic — 18″). Under Type Parameters, click the Edit button next to the Structure parameter. Change the Thickness to 18″. Click OK. Finally, click OK to exit the Type Properties dialog box.

4. Specify the project’s geographic location. On the Ribbon: Manage > Project Location > Location. For example, you can define the location by the Default City List and choose Fargo, ND. (Specifying the location will help to ensure cast shadows are accurately generated in renderings.)

5. In the Project Browser, under Floor Plans, double-click on Site.

6. Construct a toposurface. On the Ribbon: Massing & Site > Model Site > Toposurface. Next, on the Ribbon: Modify | Edit Surface > Tools > Place Point. Click in the modeling window to set four points in an approximate rectangle around the perimeter of the building. As you set each point, on the Options Bar, give each point a unique elevation. (We’ll edit this later.) On the Ribbon: Modify | Edit Surface > Surface, click the green check mark to complete the toposurface.

7. On the Quick Access Toolbar, click the 3D View tool to switch to the default 3D view.

8. Construct a Building Pad. On the Ribbon: Massing & Site > Model Site > Building Pad. Next, on the Ribbon: Modify | Create Pad Boundary > Draw, choose the Boundary Line option, then the Pick Walls tool. In turn, click on each of the exterior walls of the building. On the Ribbon: Modify | Create Pad Boundary > Mode, click the green check mark to complete the Building Pad.

9. Edit the toposurface. In the Project Browser, under Elevations, double-click on East. Click on the toposurface. On the Ribbon: Modify | Topography > Surface, click Edit Surface. In the modeling window, move the toposurface points to approximate the slope of the site. When done editing, on the Ribbon: Modify | Edit Surface > Surface, click the green check mark.

10. Add Levels. Still in the East elevation view, add levels corresponding to various floors in your building. On the Ribbon: Architecture > Datum > Level, or type LL. Click to place levels.

11. In the Project Browser, under Floor Plans, double-click on Level 1.

12. Add two building sections. Choose the Section tool from the Quick Access Toolbar.

13. On the Quick Access Toolbar, click the 3D View tool to switch to the default 3D view.

14. Adjust wall heights. Draw a window around the model. In the Properties Palette, in the Properties Filter dropdown (which should read Common), select Walls. Under Constraints, for Top Constraint, set the height of the walls. Click Apply.

15. In the Project Browser, under Floor Plans, double-click on Level 2.

16. Add a Floor. On the Ribbon: Architecture > Build > Floor. In the Properties Palette, choose a floor type corresponding to your preference (for example: Generic — 12″). Next, on the Ribbon: Modify | Create Floor Boundary > Draw, choose Boundary Line and the Pick Walls tool. In turn, click the walls which bound your floor. Next, on the Ribbon, Modify | Create Floor Boundary > Mode, click the green check mark to complete the sketch. NOTE: If you are prompted with a warning message about overlapping geometry, click Yes to join. Or, if you see a message about closed loops, this means you need to click Continue to trim or extend lines to make a complete boundary. There are a set of tools on the Modify panel for making changes. Remember to click the green check mark to complete the sketch.

17. In the Project Browser, under Sections, double-click on either section drawing. Verify the position of the floor relative to the level.

18. Copy the floors. Invoke the Copy tool (Modify > Modify > Copy, or type CO). Next, click on the floor you wish to copy. Press Enter to complete the selection.Then, click on a start point and a destination point. Repeat until all floors are copied.

19. Add a Roof. The process for adding a roof is very similar to the process for adding a floor. Begin by creating a new Level for the roof: double-click on the East Elevation view. Choose Architecture > Datum > Level (or type LL). Once placed, double-click on the name of the new Level and rename it as Roof. When prompted to rename corresponding views, choose Yes.

20. In the Project Browser, double-click on the Roof level Floor Plan view.

21. On the Ribbon: Architecture > Build > Roof (Roof by Footprint). In the Properties palette, choose an appropriate roof type (e. g., Basic Roof — Generic 12″). Next, in the Ribbon: Modify | Create Roof Footprint, choose Boundary Line and use either the Pick Lines tool, or any of the Draw tools, to draw the footprint of the roof.* When finished, click the green check mark.

* 21a (OPTIONAL). If you want to make a flat roof, make sure that the “Defines slope” check box in the Options Bar is checked “off” before you start drawing the roof footprint. Alternatively, you can go ahead and construct a pitched roof, and then change its slope to 0/12.

22. Double-click on a building section view to check the position of the roof. Note that by default, flat roofs will appear with their bottom surface flush with the level. To adjust this: click on the roof to select it; then in the Properties palette, under Constraints, enter a negative number in the Base Offset From Level. (The negative number should be equal to the depth of the roof.) Press Enter or click Apply.

23. The basic building shell is complete.

Step-by-Step: Revit Tutorial / Adding Detail to the Basic Building Shell

This tutorial is a continuation of Step-by-Step: Revit Tutorial / Basic Building Shell + Floors.

1. Add Windows to the Basic Building Shell. On the Ribbon: Architecture > Build > Window. In the Properties palette, choose an appropriate window type (e. g., Fixed 36″ x 48″).

2. In either a 3D view or a floor plan view, navigate the mouse over the model and click to place a window. Window locations can be modified after placement by clicking on dimension strings and editing them. Windows can also be moved using the Move tool (Modify > Modify > Move, or type MV).

3. To Create a Custom Window Size: On the Ribbon: Architecture > Build > Window. In the Properties palette, choose an appropriate window type (e. g., Fixed 36″ x 48″). In the Properties palette, click Edit Type. In the Type Properties dialog box, click Duplicate. Give the new window type a name (such as Custom — 72″ x 80″). Under Type Parameters, edit the Height and Width dimensions as required. Click OK to exit the Type Properties dialog box.

4. To Load Additional Window Families: On the Ribbon: Insert > Load from Library > Load Family. In the Load Family dialog box, navigate to the Windows directory and double-click on the family you wish to load. The next time you choose Window from the Architecture > Build panel, the newly loaded family will be available in the Type Selector.

5. Add Doors. Note that the process for inserting Doors is very similar to the process for Windows. Start with Architecture > Build > Door and selecting the desired door type in the Properties Palette. Doors can be placed in different views (e. g. floor plan views or 3D views).


Step-by-Step: Revit Tutorial / Creating a Simple Family

For this tutorial, we’ll create a standalone Family (.rfa extension), which could be inserted into any Project (.rvt extension). The family consists of a simple four-sided box with a floor.

1. Open Revit and begin a New Project by choosing [Application Menu] > New Project; use the Architectural template.

2. Choose [Application Menu] > New > Family. Select the Generic Model.rft template. (The Application Menu is in the far upper left hand corner of the screen.)

3. In the Project Browser, make sure the Ref. Level Floor Plan view is current: Double-click on the view name to make it current. Notes: By default, the Project Browser is docked to the left side of the Modeling Window. Its visibility is controlled with View > User Interface. In Revit, one view is always current (i. e. you are always viewing your model from a certain point, direction, and projection).

4. Set the View Scale to 12” = 1’-0”. This is done in the lower left-hand corner of the Modeling Window. Notes: This command changes the display size of text and annotations (e. g., dimensions).

5. From the Create tab, choose Forms > Extrusion. Notes: An extrusion is a solid form generated from a 2D (flat) shape.

6. In the Modify | Create Extrusion tab, choose Draw > Rectangle. Notes: This extrusion will begin with a rectangular base. Alternatively, you could draw the extrusion base using the Line tool, but it is much simpler to use the Rectangle tool.

7. In the Modeling Window, position the mouse at the intersection of the two reference lines. Click on this intersection to begin drawing the rectangle.

8. Draw a rectangle approximately 1” x 5”.

9. On the Modify | Create Extrusion tab, click the green check mark.

10. In the Properties palette, check that the Extrusion Start property is set to 0’-0”. Notes: This property relates the “bottom” of the model base to a reference plane. By default, the Properties Palette is docked to the left side of the Modeling Window. Its visibility is controlled with View > User Interface.

11. In the Properties palette, change the Extrusion End property to .25” (1/4”). This represents the thickness of the box base.

12. In the Quick Access Toolbar, click on the Default 3D View icon. Notes: This is a good way to check the 3D form of the model. The Quick Access Toolbar is at the top edge of the screen. The Default 3D View icon looks like a house.

13. To change the display thickness of the lines in the 3D view, change the View Scale to 12” = 1’-0”. Notes: This command changes the display size of text and annotations (e. g., dimensions). It also changes the display thickness of lines in 3D views.

14. In the Project Browser, double-click on the Ref. Level Floor Plan view.

15. In the Modify tab, choose Measure > Aligned Dimension. Use this tool to add a horizontal and vertical dimension to the plan of the box base.

16. Click [esc] twice. Notes: This returns you to the basic “no tools selected” view of your model.

17. Left-click on the short dimension to select it. Then right-click on the short dimension. Choose Label from the popup menu. Notes: This command begins the process of adding “parameters” to our model.

18. In the pulldown menu (below the word “<None>”), choose <Add Parameter…>. This brings up the Parameter Properties dialog box.

19. In the Parameter Properties dialog box, select Family Parameter.

20. In the Parameter Properties dialog box, under Parameter Data, name the parameter Halfwidth. Notes: This parameter represents a distance which is half the overall width of the box. Later, when we insert new instances of this family, we will be able to adjust this parameter to create boxes of different sizes.

21. In the Parameter Properties dialog box, set this as an Instance parameter (not a Type parameter). Notes: If the value of an Instance parameter is changed in a Project, the change affects only one copy of the model. By contrast, if the value of a Type parameter is changed, the change propagates to all copies of the model in the Project.

22. Click OK.

23. Repeat steps 17-22 for the long dimension, naming the parameter Halflength.

24. Click [esc] twice and Save the family as an .rfa file.

25. On the Create Tab, click Family Editor > Load into Project. Notes: This command inserts the box into the Project. It is a good way to check whether the defined parameters are operating as we mean them to do.

26. Revit automatically switches to the Project modeling window. Zoom in (spin the mouse wheel) and click in three different locations to insert three instances of the family. Click [esc] when done. Notes: The purpose of inserting multiple copies (or instances) is to compare the effects of variably adjusting the defined parameters.

27. In the Quick Access Toolbar, click on the Default 3D View icon. You should see all three instances of the family in your project.

28. Select one instance of the family by clicking on it.

29. In the Properties palette, experiment with making adjustments to the halflength and halfwidth properties.

30. Type WT (window-tile) so you can see all windows on the screen. You can close any windows which you aren’t using. Notes: After typing WT, one or more of the Modeling Windows should show you a view of the .rfa file you saved earlier. (If you have accidentally closed the family you saved earlier, you can re-open it.)

31. Click within a Modeling Window showing the family (.rfa file). Maximize the window.

32. Draw a selection window around all objects and dimensions in your model. From the Modify | Multi-Select tab, choose Modify > Mirror – Pick Axis, and reflect the objects and dimensions around either the vertical or horizontal axis. Notes: Here, we are testing whether our family is correctly defined. This step and the next one will take our box base and expand it across the x- and y-axes. Later, we will erase these expansions.

33. Repeat the previous step for the other axis.

34. Click [esc] twice and Save the family.

35. On the Create Tab, click Family Editor > Load into Project. This time, Revit will prompt you with a warning. Choose “Overwrite the existing version and its parameter values.” Notes: Revit is attempting to warn you that you have already defined this family in your project. Because you have changed the definition (mirroring the model), you are now being asked whether to update the family with the new definition.

36. Select an instance of the family. In the Properties palette, experiment with making adjustments to the halflength and halfwidth properties.

37. Return to a Modeling Window showing the .rfa file.

38. Erase the extra copies of the objects and dimensions, i. e., return to a single quadrant of the model, with the two parameters (Halfwidth and Halflength). Notes: Now that we have successfully tested the family, we’ll go back to working with a single quadrant of the base.

39. From the Create tab, choose Forms > Extrusion.

40. In the Modify | Create Extrusion tab, choose Draw > Rectangle. Use this tool to draw a rectangle corresponding to the end wall of the box.

41. On the Modify | Create Extrusion tab, click Modify > Align. Use this tool to Align the edges of the end wall with the edges of the base: click in turn on each of the lines you want to align. When a padlock symbol appears, click it to lock the edges together. Notes: This means that the wall will “follow” the edge of the base.

42. On the Modify | Create Extrusion tab, click the green check mark.

43. With the end wall still selected, in the Properties palette, check that the Extrusion Start property is set to .25” (1/4”). Notes: This property relates the “bottom” of the end wall to the top surface of the base.

44. In the Properties palette, click on the small box to the right of the Extrusion End property.

45. In the Associate Family Parameter dialog box, click Add Parameter.

46. In the Parameter Properties dialog box, select Family Parameter.

47. In the Parameter Properties dialog box, under Parameter Data, name the parameter Height.

48. In the Parameter Properties dialog box, set this as an Instance parameter (not a Type parameter).

49. Click OK.

50. In the Quick Access Toolbar, click on the Default 3D View icon. Notes: This is a good way to check the 3D form of the model.

51. In the 3D view, drag the height of the extruded wall to its desired height.

52. Repeat steps 39-49 to create the side wall. Note, when you adjust the Extrusion End property, you can select Height from the list of defined parameters.

53. Return to the Ref. Level floor plan and repeat steps 32-34 to complete the model.

54. On the Home Tab, click Family Editor > Load into Project. Again, Revit will prompt you with a warning. Choose “Overwrite the existing version and its parameter values.”

55. In the Properties palette, experiment with making adjustments to the halflength, halfwidth, and height parameters.

Step-by-Step: Revit Tutorial / Shipping Container

This step-by-step tutorial is a brief introduction to basic modeling tools in Revit. It leads to the creation of a simplified model of a shipping container (shown below).

F:~DocumentsTEACHING0_CURRENT232trainingrevitcontainer_0

1          SET UP YOUR PROJECT:

1.1       Open Revit and begin a New Project.

Under the [Application Menu] (upper left hand corner of the screen), choose New Project; use the Architectural template. See [F1] > Revit Users > Start a Project > Creating a Project from the Application Menu.

1.2       Set the East Elevation as current.

In the Project Browser (left side of screen), double-click on the East elevation view.  The Project Browser is a palette, the visibility of which is controlled by View > Windows > User Interface. By default it is docked to the left side of the screen. In Revit, one view is always current (i. e. you are always viewing your model from a certain point, direction, and projection). The behavior of certain commands is affected by the view. (For example, new Levels can only be added while viewing the project in elevation.) See [F1] > Revit Users > Introduction to Revit > User Interface > Project Browser.

1.3       Set up Levels named Floor and Roof.

Zoom in on the Level labels on the right side of the view (spin the mouse wheel, or type ZR to zoom in on a region). Double-click on the text reading “Level 2” to change it to “Roof.” When prompted to rename corresponding views, choose Yes. Repeat this procedure and change “Level 1” to “Base.” Levels are fundamental ordering devices within Revit. They can be added, deleted, renamed, and modified within Elevation views. Use Levels as references to locate floors, tops of walls, bottoms of foundations, window sills, etc. Renaming a level is usually done to make the name correspond with some desired building element (e. g., top of roof, bottom of footing, etc.). Renaming the corresponding views simply ensures that the reference will appear consistently throughout the model. See [F1] > Revit Users > Preliminary Design > Levels and Grids > Levels > Adding Levels.

1.4       Create a new Level named Ground.

Click the Modify tool. Next, on the Architecture tab, Datum panel, choose the Level tool. Zoom out to the full extents of the view (type ZE). Hover the mouse at the far left end of the Base Level line. Move the mouse slightly below the line endpoint and click to begin drawing a new Level. (The exact position of the new Level doesn’t matter at this point). Click the mouse again beneath the right endpoint of the Base Level line. Double-click on the text reading “Level 3” to change it to “Ground.” Double-click on the text indicating the height position of the Ground Level and change it to -6.5” (negative six-and-a-half inches). Click on the Modify tool to complete the task. Creating a new level doesn’t add any building elements, only a reference line and associated views (e. g., Floor Plan and Ceiling Plan). Clicking Modify on the Architecture tab is the equivalent of telling Revit that you have completed a task and are about to begin a new one. The same effect is achieved by clicking the [esc] key repeatedly (until the Modify tool highlights).

1.5       Make the Base Floor Plan current.

In the Project Browser, under Floor Plans, double-click on Base. See [F1] > Revit Users > Document and Present the Project > 2D Views > Plan Views.

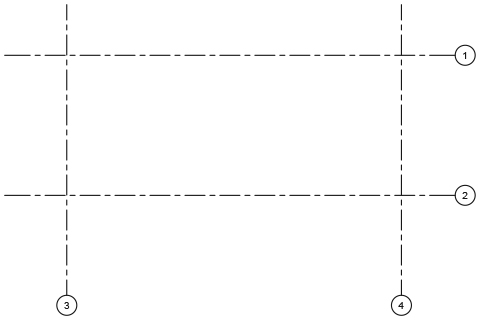
1.6       Set up two sets of parallel gridlines, establishing a horizontally oriented rectangle.

On the Architecture tab, Datum panel, choose the Grid tool. Use this tool to draw gridlines as shown in the diagram below. (The exact position of the gridlines and the numbers in the grid bubbles do not matter at this point.) Click the Modify tool to complete the task. See [F1] > Revit Users > Preliminary Design > Levels and Grids > Grids > Adding Grids.
F:~DocumentsTEACHING0_CURRENT232imagestechniquesrevit_sh

2          Construct a floor and change the floor type:

2.1       Begin to construct a floor on the Base Level.

On the Architecture tab, Build panel, choose the Floor tool. Next, on the Modify|Create Floor Boundary tab, Draw panel, click the Rectangle tool. Use this to draw a rectangle aligning with the intersections of the gridlines you drew in the previous step. See [F1] > Revit Users > Build the Model > Architectural Modeling > Floors.

2.2       Offset the long edges of the rectangle.

On the Modify|Create Floor Boundary tab, Modify panel, choose the Offset tool. In the Options bar, set the Numerical Offset to 3.5” (three-and-a-half inches). Check the “Copy” box OFF. Next, click on the two long edges of the rectangle to offset them to the outside of the gridlines. (Note that Revit will prompt you graphically to offset to either side of the existing line; click to accept Revit’s prompt.) The Offset tool makes a parallel copy of an existing object. See [F1] > Revit Users > Tools and Techniques > Editing Elements > Moving Elements > Moving Elements with the Offset Tool.

2.3       Offset the short edges of the rectangle.

Repeat the previous step, but with a Numerical Offset of 4.5” on the short edges. Click the Modify tool to complete the task.

2.4       Lock the floor-to-gridline relationships.

On the Annotate tab, Dimension panel, choose the Aligned tool. Use this tool to create a dimension between one of the gridlines and the adjacent rectangle edge. (The dimension should equal the offset you just drew.) When you see a padlock symbol, click it to “lock” the padlock. Repeat this step on all four sides of the rectangle. Locking elements to gridlines means that if the gridline is moved, the elements will move with the gridline. This is a very important concept in Revit. See [F1] > Revit Users > Document and Present the Project > Annotating > Dimensions > Permanent Dimensions > Placing Permanent Dimensions > Aligned Dimensions.

2.5       Complete the floor.

On the Modify|Create Floor Boundary tab, Mode panel, click the green check mark to complete the floor.

2.6       Test the flexibility of the gridlines.

Use the Modify tool to select and move the gridlines. The floor edge should move together with each of the gridlines. If it does not, or if you see an error message about constraints, redo the previous steps.

2.7       Change the floor type.

Use the Modify tool to select the floor (click on the floor edge to select it). In the Properties palette, click the Edit Type button. In the resulting Type Properties dialog box, click Duplicate. Give the duplicate type the name Container – 2” and click OK. Still within the Type Properties dialog box, next to the Structure parameter, click Edit. Change the Thickness to 2” (2 inches) and click OK. Click OK again to exit the Type Properties dialog box. See [F1] > Revit Users > Build the Model > Architectural Modeling > Floors > Changing the Floor Type.

3          CREATE AND PLACE CORNER BLOCKS:

3.1       Make the Ground floor plan current.

In the Project Browser, under Floor Plans, double-click on Ground.

3.2       Begin a New Family definition.

Under the [Application Menu] (upper left hand corner of the screen), choose New Family. Choose the Generic Model two level based template file. Click Open. In Revit, Families are used to organize comment components and symbols. Revit has several system families and you can also define custom families. See [F1] > Revit Users > Build the Model > Revit Families and also [F1] > Revit Users > Customize Revit > Creating Loadable Families.

3.3       Create an extrusion.

On the Create tab, Forms panel, choose the Extrusion tool. Next, on the Modify | Create Extrusion tab, Draw panel, choose the Rectangle tool. Use this tool to draw a rectangle measuring 6.5” x 7”, with one of its corners at the intersection of the reference lines. On the Modify | Create Extrusion tab, Mode panel, click the green check mark to complete the extrusion. See [F1] > Revit Users > Customize Revit > Creating Loadable Families > Creating Family Geometry > Constraining Family Geometry.

3.4       Lock the extrusion to the reference levels.

In the Project Browser, double-click on the Back Elevation view. In the Back Elevation view, select the extrusion (it is represented as a rectangle on the Lower Ref. Level). Drag the triangular handle at the top of the extrusion vertically until it reaches the Upper Ref. Level. Click on the padlock symbol to “lock” the padlock. Repeat this procedure for the handle on the Lower Ref. Level (you will need to drag the handle away from the level and back again). Click the Modify tool to complete the procedure. The Reference Levels refer to actual Levels in your project. Because the family component can be placed on any level, the Family Editor uses the term “Reference Level.”

3.5       Save the family.

Under the [Application Menu], choose Save. Save the family as corner_block.rfa.

3.6       Load the family into your project.

On the Modify tab, Family Editor panel, choose Load into Project (the .rvt file). See [F1] > Revit Users > Build the Model > Revit Families > Loading and Saving Families.

3.7       Check that the corner_block component is ready to place.

In the Properties palette, check that “corner_block” is visible. If it is not, choose the Place a Component tool (Architecture tab, Build Panel, Component > Place a Component). See [F1] > Revit Users > Build the Model > Architectural Modeling > Components > Placing Components.

3.8       Place the corner_block component.

Zoom into the lower left-hand corner of the Ground Floor Plan. Click to place the family at the corner of the floor as shown in the diagram below.

F:~DocumentsTEACHING0_CURRENT232trainingrevitcontainer_0

3.9       Change the Visual Style to Wireframe.

On the View Control Bar, click the cube icon and select Wireframe.

3.10     Check the family’s reference levels.

Make sure the component is selected. In the Properties palette, set the component’s Base Level to Ground and the Top Level to Base. Set the Top Offset to -2” (negative two inches).

3.11     Mirror the corner block around the short side of the floor.

Use the Modify tool to select the corner_block family. On the Modify | Generic Models tab, Modify panel, choose the Mirror – Draw Axis tool. To draw a mirror axis, hover the mouse over the midpoint of the short side of the floor rectangle until the Midpoint snap indicator appears. Click on this point. Next, click on a second point exactly to the right or left of this point to establish a horizontal mirror line. The corner_block family is mirrored to the opposite corner.

3.12     Mirror two corner blocks around the long side of the floor.

Repeat the previous step, but select both corner_blocks, and mirror them around the midpoint of the long side of the floor rectangle. Refer to the diagram below.

F:~DocumentsTEACHING0_CURRENT232trainingrevitcontainer_0

3.13     Change the View Scale to 3” = 1’-0”.

On the View Control bar, click the text reading 1/8” = 1’-0” and change it to 3” = 1’-0”. The View Scale setting controls the display of elements and objects in a drawing (e. g., annotation, dimensions, material patterns). In this example it will make the annotations easier to read, relative to the size of the building being modeled. See [F1] > Revit Users > Document and Present the Project > Use and Manage Views > Changing the Graphics of a View > View Scale.

3.14     Zoom into the lower left-hand corner of the floor.

Spin the mouse wheel or type ZR.

3.15     Lock the block-to-gridline relationships and the overall block dimensions for each of the copied corner_blocks.

On the Annotate tab, Dimension panel, choose the Aligned tool, and use it to dimension the component-to-gridline relationships, making sure to click the padlock symbol to “lock” the padlock. Refer to the diagram below. Repeat this procedure for the instance of the corner_block component at the other corner of the floor.

revit_shipping_container_tutorial_15

3.16     Zoom out.

Spin the mouse wheel or type ZE.

3.17     Test the flexibility of the gridlines.

Use the Modify tool to select and move the gridlines. The corner blocks should move together with each of the gridlines. If they do not, or if you see an error message about constraints, redo the previous steps.

4          CREATE AND PLACE FRONT CORNER POSTS:

4.1       Make the Base floor plan current.

In the Project Browser, under Floor Plans, double-click on Base.

4.2       Begin a New Family definition.

Under the [Application Menu] (upper left hand corner of the screen), choose New Family. Choose the Generic Model two level based template file. Click Open. This takes you into the Family Editor.

4.3       Create an extrusion.

On the Create tab, Forms panel, choose the Extrusion tool. Next, on the Modify | Create Extrusion tab, Draw panel, choose the Rectangle tool. Use this tool to draw a rectangle measuring 2” x 9.5”, with one of its corners at the intersection of the reference lines. On the Modify | Create Extrusion tab, Mode panel, click the green check mark to complete the extrusion.

4.4       Lock the extrusion to the reference levels.

Using the same procedure you used for the corner_block family, lock the top and bottom of the extrusion to the Upper and Lower Reference Levels.

4.5       Save the family.

Under the [Application Menu], choose Save. Save the family as corner_post_front.rfa.

4.6       Load the family into your project.

On the Modify tab, Family Editor panel, choose Load into Project (the .rvt file). Zoom in to the Base Floor Plan to place the family at the corner of the floor. Once placed, mirror it to the opposite corner. Refer to the diagram below.

F:~DocumentsTEACHING0_CURRENT232trainingrevitcontainer_0

4.7       Change the View Scale to 3” = 1’-0”.

On the View Control bar, click the text reading 1/8” = 1’-0” and change it to 3” = 1’-0”.

4.8       Lock the family to the gridlines.

On the Annotate tab, Dimension panel, choose the Aligned tool, and use it to dimension the component-to-gridline relationships, making sure to click the padlock symbol to “lock” the padlock. Refer to the diagram below. Repeat this procedure for the instance of the component at the other corner of the floor.
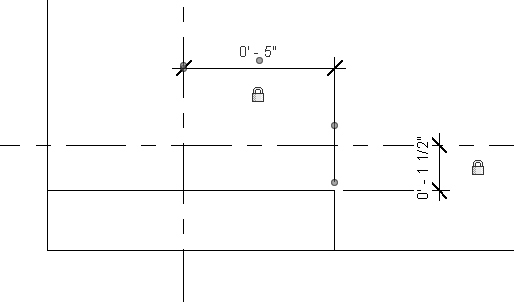
revit_shipping_container_tutorial_07

4.9       Test the flexibility of the gridlines.

Use the Modify tool to select and move the gridlines. The corner blocks should move together with each of the gridlines. If they do not, or if you see an error message about constraints, redo the previous steps.

5          CREATE AND PLACE REAR CORNER POSTS:

5.1       Begin a New Family definition.

Under the [Application Menu], choose New Family. Choose the Generic Model two level based template file. Click Open.

5.2       Create an extrusion.

On the Create tab, Forms panel, choose the Extrusion tool. Next, on the Modify | Create Extrusion tab, Draw panel, choose the Line tool. On the Options bar, check “Chain” on. Use the Line tool to draw a figure corresponding with the diagram below, with the outside corner of the “L” at the intersection of the reference lines. On the Modify | Create Extrusion tab, Mode panel, click the green check mark to complete the extrusion.
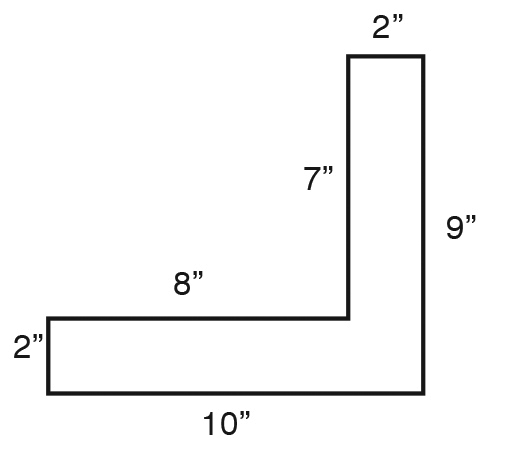
revit_shipping_container_tutorial_16

5.3       Lock the extrusion to the reference levels.

Using the same procedure you used for the corner_post_front family, lock the top and bottom of the extrusion to the Upper and Lower Reference Levels.

5.4       Save the family.

Under the [Application Menu], choose Save. Save the family as corner_post_rear.rfa.

5.5       Load the family into your project.

On the Modify tab, Family Editor panel, choose Load into Project (the .rvt file). Zoom in to the Base Floor Plan to place the family at the corner of the floor. Once placed, mirror it to the opposite corner. Refer to the diagram below.

F:~DocumentsTEACHING0_CURRENT232trainingrevitcontainer_0

5.6       Lock the family to the gridlines.

On the Annotate tab, Dimension panel, choose the Aligned tool, and use it to dimension the component-to-gridline relationships, making sure to click the padlock symbol to “lock” the padlock. Refer to the diagram below. Repeat this procedure for the instance of the family at the other corner of the floor.

revit_shipping_container_tutorial_09

5.7       Zoom to the extents of the model.

Type ZE.

5.8       Check the corner_post component for position and flexibility.

Use the Modify tool to select and move the gridlines. The floor edge and the family instances (the corner posts) should move together with each of the gridlines. If they do not, or if you see an error message about constraints, redo the previous steps.

6          CREATE WALLS:

6.1       Begin the construction of a side wall.

On the Architecture tab, Build Panel, choose the Wall: Architectural tool. See [F1] > Revit Users > Build the Model > Architectural Modeling > Walls.

6.2       Edit the wall type.

In the Properties palette, make sure the Basic Wall – Generic 8” type is current. click the Edit Type button. In the resulting Type Properties dialog box, click Duplicate. Give the duplicate type the name Container – Corrugated and click OK. Still within the Type Properties dialog box, next to the Structure parameter, click Edit. Change the Thickness to 2” (2 inches) and click OK. Click OK again to exit the Type Properties dialog box. Predefined wall types exist to facilitate the creation of models. Types and instances can be modified using the Properties palette. See [F1] > Revit Users > Build the Model > Architectural Modeling > Walls > Modifying Walls > Changing the Type of a Wall.

6.3       Place an instance of the wall.

On the Architecture tab, Build Panel, choose the Wall: Architectural tool. On the Options bar, set the Height to Roof. Set the Location Line to Finish Face: Exterior. Check the “Chain” box off. Click on the point marked A in the diagram below to begin placing the wall. Click on point B to complete the wall. Then click on the Modify tool to complete the command. Height is a constraint. Any change to the location of the Roof level will affect the height of the walls constrained to it. (Choosing Unconnected for Height omits the constraint.) See [F1] > Revit Users > Build the Model > Architectural Modeling > Walls > Placing Walls.

F:~DocumentsTEACHING0_CURRENT232trainingrevitcontainer_0

6.4       Place two more instances of the wall.

Repeat the previous step to place two additional instances of the wall. Choose the Default 3D view to check that the model corresponds with the diagram below. The Default 3D View is a quick way to get a 3D view of the project. Click on the house icon in the Quick Access Toolbar (top of screen). See [F1] > Revit Users > Introduction to Revit > User Interface > Quick Access Toolbar and [F1] > Revit Users > Document and Present the Project > 3D Views > Creating a Perspective 3D View.
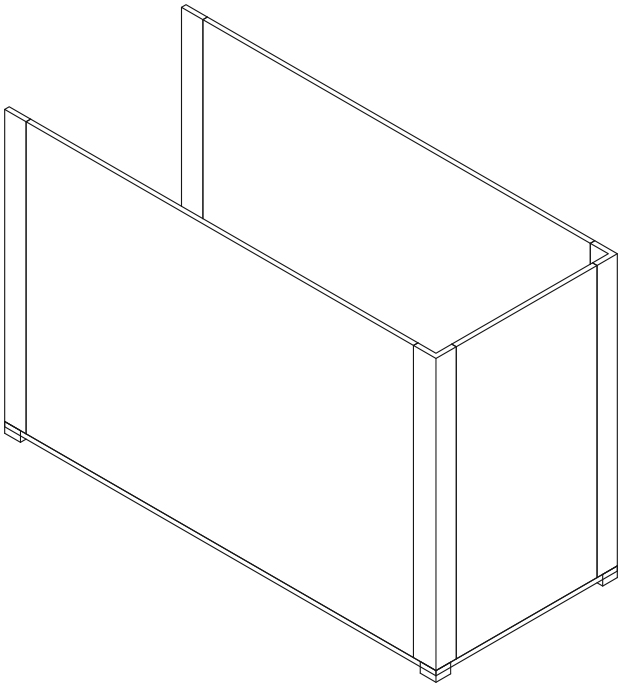
F:~DocumentsTEACHING0_CURRENT232trainingrevitcontainer_0

6.5       Restore the Base floor plan.

Double-click on the Base Floor Plan.

6.6       Lock the wall ends to the gridlines, and the wall centerlines to the gridlines.

On the Annotate tab, Dimension panel, choose the Aligned tool, and use it to dimension the wall-end-to-gridline relationships, making sure to click the padlock symbol to “lock” the padlock.  Repeat this procedure for the wall-centerlines-to-gridline relationships.

6.7       Check the walls for position and flexibility.

Use the Modify tool to select and move the gridlines. The walls should move together with each of the gridlines. If they do not, or if you see an error message about constraints, redo the previous steps.

6.8       Check the walls and corner posts for height conformance.

Double-click on the North Elevation to make that view current. Use the Modify tool to select and move the Roof Level up and down. Repeat this procedure with the East Elevation. In both views, the top of the walls and corner posts should move together with the Roof Level. If they do not, or if you see an error message about constraints, redo the previous steps.

7          CONSTRUCT ROOF:

7.1       Make the Roof plan current.

Double-click on the Roof Floor Plan.

7.2       Insert a corner_block component.

On the Architecture tab, Build panel, choose the Component > Place a Component tool. At the top of the Properties panel, click the type selector (it should currently display the corner_post_rear component). Change the type selector to the corner_block component. Insert this component at the lower left-hand corner of the Roof floor plan.

7.3       Correct the component’s height.

Use the Modify tool to select the component you just placed. In the Properties palette, check that its Base Level is set to Roof. Change its Top Offset to 4.5” (four-and-a-half inches).

7.4       Mirror the component.

Using a procedure similar to the one you had used with the original set of corner_block components, mirror the component to all four corners of the Roof floor plan.

7.5       Lock the components to the gridlines.

Use the same procedure you’ve used previously (Aligned dimensions with padlock symbols).

7.6       Make the Default 3D View current.

7.7       Construct walls between corner blocks.

Using a procedure similar to the one you used earlier to construct the container’s side walls, use the Wall: Architectural tool to build four “rails” around the top edge of the container as shown in the diagram below. Note, when you begin constructing the first wall, set the Base Constraint to Roof, the Top Constraint to Unconnected, and the Unconnected Height to 4.5” (four-and-a-half inches).

F:~DocumentsTEACHING0_CURRENT232trainingrevitcontainer_0

7.8       Lock the wall ends and wall centerlines to the gridlines.

Use the Aligned dimension tool.

7.9       Make the Roof floor plan current.

Double-click on the Roof floor plan.

7.10     Begin to construct a roof.

On the Architecture tab, Build panel, choose the Roof > Roof by Footprint tool. See [F1] > Revit Users > Build the Model > Architectural Modeling > Roofs

7.11     Edit the roof type.

In the Properties palette, make sure the Basic Roof – Generic 12” type is current. Click the Edit Type button. In the resulting Type Properties dialog box, click Duplicate. Give the duplicate type the name Container – 4.5” and click OK. Still within the Type Properties dialog box, next to the Structure parameter, click Edit. Change the Thickness to 4.5” (four-and-a-half inches) and click OK. Click OK again to exit the Type Properties dialog box.

7.12     Outline the roof.

On the Modify | Create Roof Footprint tab, Draw panel, choose the Line tool. On the Options bar, check Defines Slope off; check Chain on. Use the Line tool to outline the roof as shown in the diagram below. By checking the “Defines Slope” option off, Revit will create a flat roof.

F:~DocumentsTEACHING0_CURRENT232trainingrevitcontainer_0

7.13     Lock the roof edges and corner notches to the gridlines.

Use the same procedure you’ve used previously (Aligned dimensions with padlock symbols). There will be a total of 12 dimensions: one on each roof edge, and two at each of the corner notches.

7.14     Complete the roof.

On the Modify | Create Roof Footprint tab, Mode panel, click the green check mark.

8          CREATE A DOOR:

8.1       Set the Base floor plan as current.

Double-click on the Base floor plan. See [F1] > Revit Users > Build the Model > Architectural Modeling > Doors > Placing Doors.

8.2       Adjust the gridlines to their correct positions.

Begin by using the Aligned Dimension tool to establish a dimension between any two parallel gridlines. Click the Modify tool. Then click on one of the gridlines you just dimensioned. Finally, click on the highlighted dimension to change its value. (The “long” dimension is 38’-4”, and the “short” dimension is 7’-5”.

8.3       Create a wall closing the open side.

On the Architecture tab, Build panel, choose the Wall: Architectural tool. Before placing the wall, check the Properties palette. The Base Constraint should be set to Base and the Top Constraint should be set to Up to Level: Roof.

8.4       Begin a New Family definition.

Under the [Application Menu], choose New Family. Choose the Door template file. Click Open.

8.5       Make the Exterior view current.

In the Project Browser, double-click on the Exterior Elevation view.

8.6       Modify the door frame.

In the elevation view, double-click on the extrusion representing the door frame. Double-click on the text reading Frame Width = 0’-3”. Change the frame width parameter to 1/2” (one-half inch). Click the green check mark (Modify | Edit Extrusion tab) to complete editing.

8.7       Set the door width and height as instance parameters.

Click on the text reading Width = 3’-0”. In the Options bar, check Instance Parameter on. Repeat this step for the Height.

8.8       Save the family.

Save this family as container_door.rfa.

8.9       Load the family into your project.

On the Modify tab, Family Editor panel, choose Load into Project (the .rvt file).

8.10     Place the door.

Insert the door at the midpoint of the wall you drew earlier. Click the Modify tool to complete the task.

8.11     Invoke the Default 3D view.

8.12     Modify instance properties.

Select the door. In the Properties palette, under Dimensions, change the Sill Height to 1”, the Height to 8’-3”, and the Width to 7’-0”.

8.13     The model is complete.


Revit: A Tour of the Interface

Print

1. Start Revit. Under Projects, select Architectural Template.

2. From the QUICK ACCESS TOOLBAR, click on the Default 3D view icon (it looks like a house).

3. On the Architecture tab in the RIBBON, find the Work Plane panel (far right side). Click on Show.

4. On the Architecture tab, Build panel, click Wall.

5. With the Wall command active, choose a wall type from the top area of the PROPERTIES PALETTE. (This area of the palette is known as the Type Selector.)

6. While the Wall command is active, notice that the RIBBON has changed to include a new set of tools. On the Modify | Place Wall tab, from the Draw panel, choose the Rectangle drawing tool.

7. Draw a rectangular enclosure by clicking two corner points on the Work Plane.

8. Choose Architecture > Build > Door. Insert one or more doors in the wall. Notice that Revit restricts how doors can be placed (i. e., doors must be “hosted” by walls).

9. Choose Architecture > Build > Window. Insert one or more windows in the wall. Windows must also be “hosted” by walls.

10. In the PROJECT BROWSER, double-click on the East Elevation view. Use this view to add new Levels (choose Architecture > Datum > Level, or Modify > Modify > Copy), or to change the location of existing Levels.

11. Return to the Default 3D view, and click on one wall of the rectangular enclosure. With the wall selected, change the Top Constraint (found in the PROPERTIES PALETTE) from Unconstrained to “Up to Level…”

12. Experiment with switching between views in the PROJECT BROWSER and changing the height of Levels.

What is Revit?

Revit is Building Information Modeling (BIM) software. Like AutoCAD, Rhino, or SketchUp, Revit can be used to construct a digital model of a building. Unlike these applications, Revit allows elements within a building model to be linked by adjustable parameters. This means that in a Revit model, the behavior of building elements can be mathematically defined; an important consequence is that elements can be linked to each other in such a way that a change to one results in an automatic change to others.

For example, raising the roof of a building in Revit will automatically increase the height of walls whose heights are constrained to the underside of the roof. Or, moving a wall in plan will automatically adjust the lengths of other walls whose endpoints are linked to the first wall.

Families of elements can be defined in Revit, such that changing the definition of a family will automatically change instances of that family throughout the model. For example, a single family of differently-sized windows can be defined, each sharing a common trim design and mullion profile. A change at the family level to the trim design will automatically update all windows in the project based on this family, regardless of their size.

Clearly, the act of constructing a parametric building model transcends the act of constructing a three-dimensional model like ones you may have built in SketchUp, Rhino, or AutoCAD. Revit depends, as these other applications also do, upon a designer’s ability to visualize and work within an on-screen simulated three-dimensional environment. Additionally, the act of creating a parametric building model in Revit requires that a designer be able to intelligently define relationships between and within building elements. It is also true that the successful user of Revit, in addition to understanding how the software works, must understand construction technology sufficiently well in order to intelligently define such relationships.

See:

www.autodesk.com/products/revit-family/overview for information, features overview, and other resources.

knowledge.autodesk.com/support/revit-products for miscellaneous support.

forums.autodesk.com/t5/revit-architecture/bd-p/133 for a discussion forum.


Techniques for Reducing File Size

This page summarizes file-size reduction techniques for several software applications. File-size reduction strategies are usually directed toward managing the overall size of a package of documents.

NOTE: As a general rule, full-size (non-reduced) copies of important documents should always be archived and backed up: reduced-size copies are not usually meant as a replacement for full versions.


REDUCING FILE SIZE IN PHOTOSHOP IMAGES:

MANAGING LAYERS. A reduced-size Photoshop image, regardless of file type, should always be “flattened” into a single layer. Use the Layer > Flatten Image command.

MANAGING IMAGE RESOLUTION. Use the Image > Image Size command to adjust image dimensions and resolution. Images measuring approximately 5” or 6” in their longest dimension, with a resolution of 150 or 200 pixels per inch, usually represent a good balance between file size and image quality.

CHOOSING THE PROPER FILE TYPE. Generally, though not always, the smallest Photoshop files will be met by using the JPEG file type. Use the File > Save As command. Setting the JPEG quality to “Medium” will represent a good balance of size and quality. In the case of images with large areas of solid color, using the TIFF format (with LZW compression) will usually result in a smaller file.


REDUCING FILE SIZE IN ILLUSTRATOR DOCUMENTS:

CHOOSING THE PROPER FILE TYPE. Illustrator uses two different “native” file formats, AI and PDF. To reduce file size, use the File > Save As command to save your Illustrator file in PDF format. When prompted to choose an “Adobe PDF Preset,” choose “Smallest File Size.”

ADDITIONAL OPTIONS. Refer to this site for a detailed description of Illustrator optimization techniques:
http://helpx.adobe.com/illustrator/kb/optimize-native-pdf-file-sizes.html


REDUCING FILE SIZE IN PDF FILES:

COMBINING DOCUMENTS IN ADOBE ACROBAT. If you choose to combine files into a single PDF, click the “Smallest File Size” icon. Use the “Single PDF” rather than the “PDF Portfolio” option.

PRINTING AS THE SMALLEST FILE SIZE. Open a PDF in Acrobat. Choose File > Print. Select PDF as your printer (Adobe PDF or a PDF Writer). Click the “Properties” button. Under “Default Settings,” choose “Smallest File Size.” Click OK, and then click Print.


REDUCING FILE SIZE IN AUTOCAD DRAWINGS AND MODELS:

PURGING THE AUTOCAD DRAWING. AutoCAD drawings often contain unnecessary information (e. g., unused blocks, layers, text styles, etc.). Type PURGE at the command prompt to eliminate such information. Follow the PURGE command with the File > Save As command.

THE OVERKILL COMMAND. Type OVERKILL at the command prompt to delete certain kinds of information in the drawing, e. g., lines which overlap other lines.

FILE > SAVE AS. Use this command to save a new copy of your AutoCAD file. This will usually reduce file size.


REDUCING FILE SIZE IN REVIT MODELS:

PURGING UNUSED ITEMS. Under the Manage tab, Settings panel, choose Purge Unused. This tool will tend to have a greater effect on Projects than Families.

[APPLICATION MENU] > SAVE AS. Use this command to save a new copy of your Revit file. This will usually reduce file size. Test the effect of checking the “Compact File” option while saving (Click Options in the Save As dialog box).


REDUCING FILE SIZE IN RHINO MODELS:

PURGE THE MODEL. Type PURGE at Rhino’s command prompt.

FILE > SAVE AS. Use this command to save a new copy of your Rhino file. This will usually reduce file size.


REDUCING FILE SIZE IN SKETCHUP MODELS:

PURGE UNUSED. Choose Window > Model Info > Statistics; click Purge Unused. Follow this with File > Save As.

ELIMINATE TEXTURES. A copy of your model saved without textures will be much smaller than the same model with textures.

FILE > SAVE AS. Use this command to save a new copy of your SketchUp file. This will usually reduce file size.